Jenkins Setup :
Jenkins is an open-source automation server that allows the implementation of CI/CD by automating various parts of software development and deployment. In this demo we are going to automate build process for iOS & flutter projects by building the respective projects every time a code push has been done to a code repository using Jenkins.
First of all let’s start with the installation of Jenkins in the development device. The development device we are going to use here is a Mac but the installation steps should be similar in other operating systems as well. We are going to use the homebrew package manager to install jenkins so make sure homebrew is installed in your device. To install jenkins server insert the following command into the terminal “brew install jenkins-lts”.
This should start the installation which would take a few minutes.
Once the installation is complete run the following command in the terminal “jenkins-lts” to start-up the server. Now open the jenkins server’s dashboard by opening “http://localhost:8080” in a browser it should request you for a auto-generated admin password which will be visible in the terminal where you start the jenkins server so switch back to your terminal and copy-paste the admin password to the password field in the jenkins dashboard.
Next just select “Install suggested plugins” to install the basic plugins needed for jenkins. Installing the plugins may take a few minutes once done you will be prompted with a screen to create a new admin user just enter your preferred username and password, once done you’ll be presented with jenkins dashboard where you can create ,view and modify new CI/CD jobs.
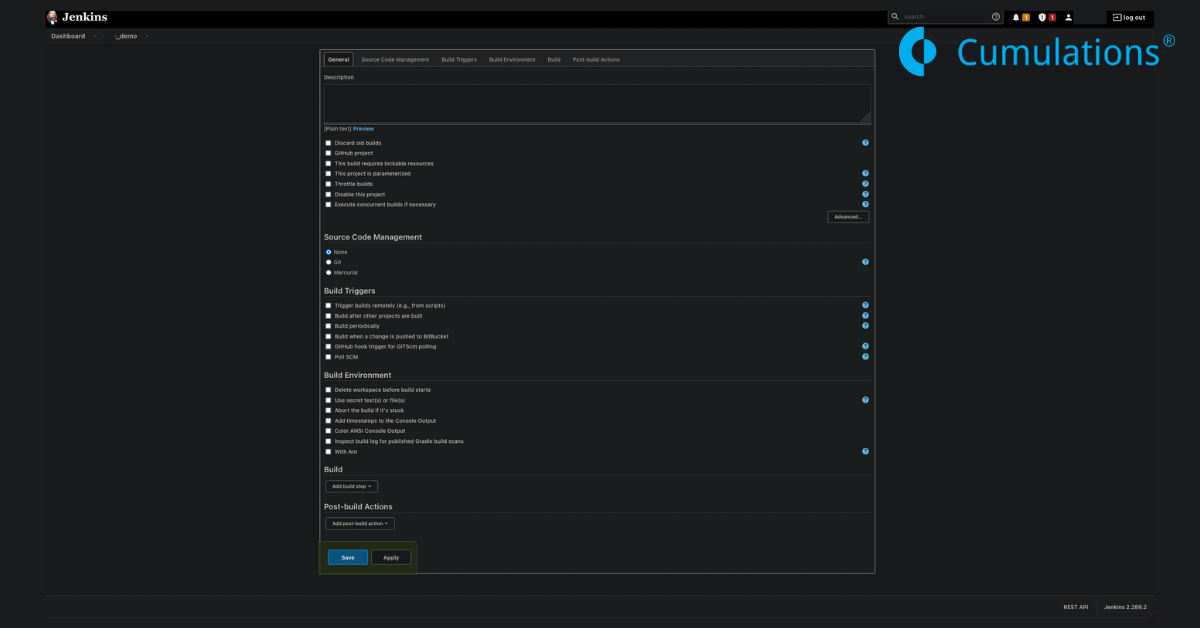
Here for simplicity we will be creating a basic jenkin build job to automate the build process of iOS and flutter projects. So select “Freestyle project” and enter a name for the project then tap on “OK” now you’ll be presented with the configuration screen for your jenkins project here you can configure the SCM details of your project, Build trigger for your build job and Build action.

Build Job configuration
Under the Source code management section select git as the SCM system if your projects uses git SCM system ,then in the Repository URL field copy-paste your flutter/iOS repository URL. If in case your repository is private add the credentials under credentials of the Repositories section.
For now leave the branch to build as master.
Final step is to set up the build process itself which depends on what kind of application it is.
Here the project we are demonstrating is for iOS/flutter project.
Fastlane Setup:
Here we are going to use the Fastlane deployment tool to build an iOS project. Fastlane is an open-source deployment tool that allows to automation the build and deployment process for Android/iOS. Fastlane also handles the code-signing process by creating the application in the AppStoreConnect and Apple member center and also creating the appropriate provisioning profiles for iOS applications.
To use fastlane install fastlane using homebrew package manager by running the following command in the terminal “brew install fastlane”.Once installed change your working directory to your iOS project’s root directory and run the following command in the terminal “fastlane init” and select the fourth step “Manual setup”.
Now a directory named “Fastlane” should be created in your iOS project’s root directory with two files in the directory named Appfile and Fastfile. Here Fastfile contains the different methods(lanes) that can be run to automate build process. Initially the fastfile contains only a single lane(method) several lanes can be added as per preference to perform different actions.
More about defining lanes can be found here https://docs.fastlane.tools/advanced/lanes/. The Appfile basically contains the details about your application which includes the bundle-ID, apple-ID to be used to authenticate with apple member center ,team name etc.
For simplicity let’s configure fastlane to create an ad hoc build which can be shared and also create the provisioning profiles for the build. First of all add the following details to your Appfile:
app_identifier("{bundle_identifier}") # The bundle identifier of your app

apple_id("{apple_id}") # Your Apple email address

itc_team_name("{team_name}") # Your Apple team name

team_id("{team ID}") # Your Apple team ID


Next add the lanes for building an adhoc build for iOS in your Fastfile:


default_platform(:ios)


platform :ios do


 desc "Configure app store connect and member center for the app"

 lane :prepare do |options|

   produce(

     app_identifier: "{bundle_id}",

     app_name: "{app name}",

     skip_itc: false

   )

   cocoapods(clean_install:true,repo_update:true)

 end

 desc "Builds an adhoc build"

 lane :adhoc do |options|

   sigh(adhoc:true)

   build_app(

     clean:true,

     export_method: "ad-hoc",

output_directory: "path/to/dir"

   )

 end

end
Now fastlane is configured to be used for your project .Here sigh ,build_app are few of the several actions that fastlane provides which can be referred from https://docs.fastlane.tools/actions/.
Now try to build an adhoc build by running the following commands in the root directory of your iOS project “fastlane prepare” then “fastlane adhoc ” this should ask a few details to communicate with the Apple servers and this is a one time setup, then your app-id should be registered in the member center and AppStoreConnect ,also will create required provisioning profiles for the adhoc build and finally it initiates the build which may take some time based on your project .
You should get “fastlane.tools finished successfully” in your terminal showing that the build was successful and now you can find the ipa of the adhoc build under configured output_directory which can be shared to the internal testers.
Since the fastlane setup is finished let’s commit the fastlane files and push it to our remote git repository.
Build Step Configuration for APK and IPA Generation:
Now lets setup jenkins to build APK and IPA files for distribution by using flutter and fastlane.
Since building an APK wouldn’t need the necessary code signing as in case of iOS we will straight away use Flutter to generate the APK and for generating an iOS build we will use fastlane.
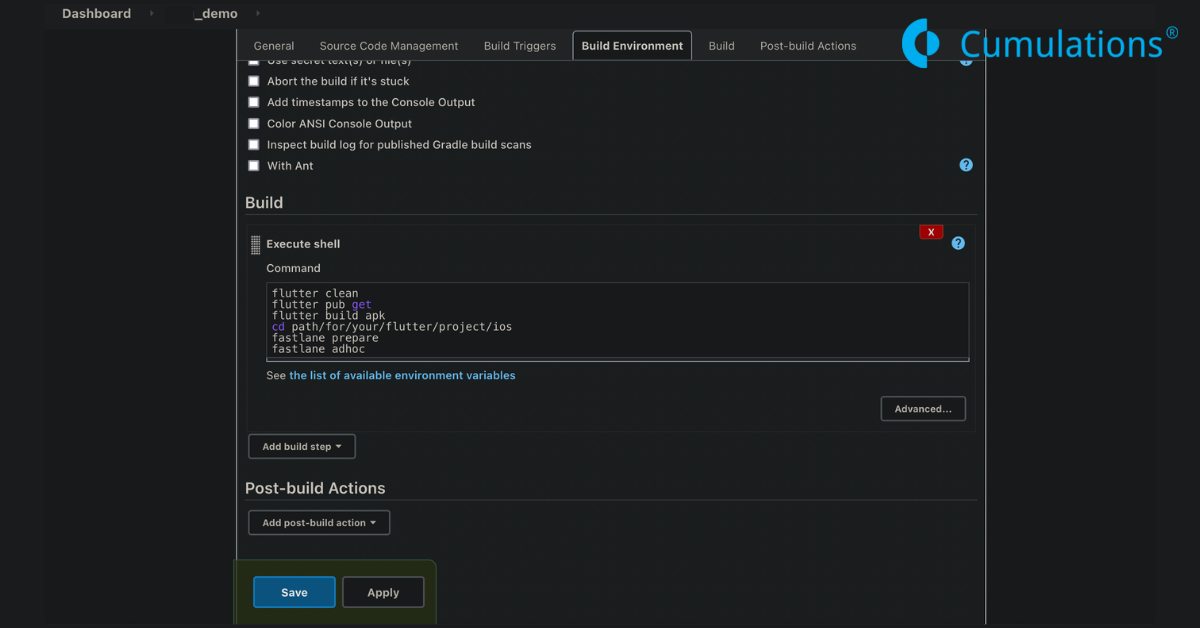
To do that lets navigate to configuration for your build job in jenkins dashboard and under “Build” section tap on “Add build step” and select “Execute shell” option. In the command field enter the following commands to generate APK
“flutter clean”
“flutter pub get”
“flutter build apk”
For iOS build generation in Flutter, first we have to change the current working directory to the folder containing the iOS project and trigger fastlane to prepare the project and build IPA for adhoc distribution so add the following commands after the commands for APK generation.
cd path/for/your/flutter/project/ios

fastlane prepare

fastlane adhoc
If you are facing issues with getting access to the keychain on your system, include the following command at the beginning of “Execute Shell” commands.
“security -v unlock-keychain -p "{username}" $HOME/Library/Keychains/login.keychain”
Build step configuration
Now tap on save to save the project configurations and in the dashboard’s main screen select your project and tap on “Build Now” to initiate the build just to check whether your build steps works fine. You can see the logs for the build process by selecting the console output that you get after selecting the current building process in the build queue on the left hand side of the jenkins dashboard.
Now that the our jenkins job is working fine let’s configure the job to be triggered every time some code is pushed to the repository for that we would need to configure the remote git repository to notify the jenkins server every time a code push is done to the remote repository. Here we are using BitBucket for the remote repository.
Before we configure the bitbucket lets add a plugin to jenkins. Jenkins have lot of plugins which can be used for several specific tasks so lets navigate to the manage plugins section which can be found following “Manage Jenkins” -> “Manage Plugins” from the jenkins dashboard. Search for the “Bitbucket Plugin” under the “available plugins” tab and select “Install without restart”. Now the bitbucket plugin is installed.
Bitbucket Trigger Integration:
Lets configure the build job we created to be triggered every time code is pushed to the remote repository. To do that let’s configure the build trigger for your jenkins job which as the name suggests means the condition when the build job should be triggered. Lets navigate to the Build trigger section by following “build job name” -> “configure” .
Under the Build trigger section lets select “Build when a change is pushed to BitBucket” as the build trigger. Now the build job is started every time a code push is done to the configured remote repository.
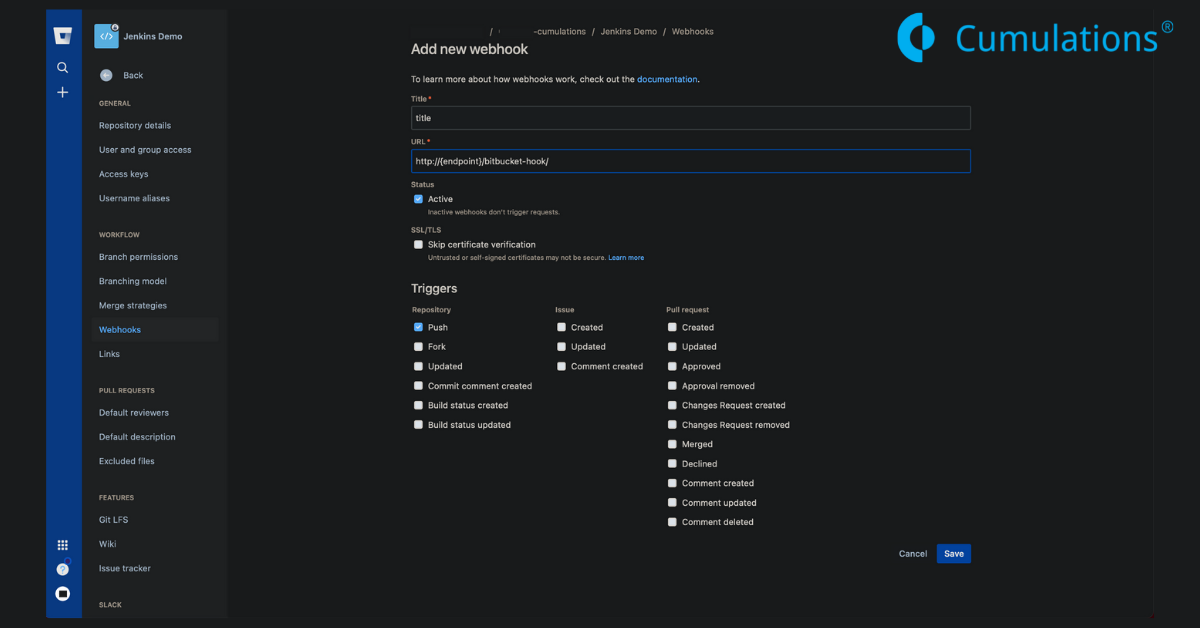
To finish up let’s configure the bitbucket repository to notify the jenkins server whenever a code push is done to do that create a webhook for the repository and input the URL for your jenkins server which may need for your jenkins server port(8080) to be public.
You can use a third party tool such as ngrok to create a tunnel to your IP refer https://ngrok.com/docs . Anyways the URL should be in the form of “http://{endpoint}/bitbucket-hook/”. Once the webhook has been added to the repository bitbucket will notify every time a code push is done to the remote repository.
Finally you are done and try to push the code with changes to the remote repository and you can see that jenkins detects the code push automatically and starts a build. You can find the build under the configured output directory.

Suggestions
1: Clarify Jenkins Role in CI/CD
- Add: A brief overview of CI and CD concepts, emphasizing how Jenkins automates these processes.
2: Alternative Installation Methods
- Mention: Other installation methods for Jenkins, such as using a package manager (e.g., apt, yum) or downloading the WAR file.
- Provide: Basic steps for these methods if space permits.
3: Project Type and Build Configuration
- Specify: The difference in build configuration between Flutter and native iOS projects.
- Highlight: The importance of configuring environment variables for build parameters.
4: Fastlane’s Role in CI/CD
- Expand: On Fastlane’s capabilities beyond build and deployment (e.g., code signing, screenshots, metadata management).
5: Fastlane Configuration Details
- Provide: More specific examples of Fastlane configuration options (e.g.,
match,deliver). - Address: Common Fastlane setup challenges (e.g., provisioning profiles, certificates).
6: Webhook Configuration Details
- Include: A basic example of a Bitbucket webhook configuration.
- Mention: Other SCM platforms (e.g., GitHub, GitLab) and their corresponding plugins.
7: Flutter Build Optimization
- Suggest: Using
flutter build --releasefor production builds. - Recommend: Considering build caching strategies to improve build times.
8: Keychain Access Alternatives
- Explore: Other keychain access methods (e.g., using the
securitycommand with different options). - Warn: About security implications of storing keychain passwords in plain text.


 +91-984-5825982 | +91-996-4689921
 sales@cumulations.com
 Send your requirement